Saturday, 27 June 2015

Monday night at the movies

Hi Sweethearts,

I haven't done a lifestyle update in a while, so I thought this would add another side to my blogging. Also with my upcoming trip back to Germany that I'd like to blog about, it's a chance to see what I like doing in my free time.

Last Monday my BF & I arranged to go on a date evening after I finished work.
 We haven't been out to Glasgow for a while, so took the free evening as a good opportunity to do so.

Like an excited child, I desperately wanted to see Jurassic World at the Cinema. However, because I'm a ridiculous childish person at times, so I really wanted the full Dinosaur experience at Cineworld....not only in 3D, but with D-Box seats! Everytime a Dino stomped, our seats would vibrate - it was so cool!
*stomp stomp stomp*

I really enjoyed the movie, even more so with the full experience, and have totally decided that I need a Raptor in my life....but the Mister says I'm not allowed T_T

Before the movie, we went for a Blue Monday trip to Yo!Sushi at House of Frazers.
 For anyone that knows me, this is usually a bad (and costly) idea as I will eat everything in sight, and fight with you over the last piece on the plate >.>  <,<
 My Absolute Favourite thing to eat is Takoyaki, and this time we settled on getting 2 portions so that we didn't fight over them!
 They had a few new things on the menu, one of which was Pumpkin Katsu ....and oh my, it was absolutely delicious! I'm not usually a pumpkin person, but it was so tasty that we had to get another round of it!

Here's a little collage of our evening, including a sneaky pic of the Mister (please excuse the obligatory bathroom selfie)!


Love,

 Kasumi x

Friday, 26 June 2015

L'oreal: Miss Manga vs. Miss Manga Punky (Review)

Hi Sweethearts,

I ventured into Superdrug recently to find myself a new mascara after my Eye inflammation - I wasn't going to take any chances on mascara.

Finally I decided to bite the bullet and try the L'Oreal Miss Manga Mascara...but was then confronted with about 4 different types!

What I bought:


So, I ended up buying both the Original Miss Manga & The Punky version, to pitt them against each other to see which I prefer, and if they are as interesting as they look.  (and it was 2 for £12 - usually £8.99 each, although superdrug has now reduced punky to £4.99)


The Wands:

Miss Manga:


Ok, so this is the wand for the original Miss Manga Mascara!

It is slightly more tapered than the mascara wands I'm used to, and shapewise it reminds me a little of a bud shape - much like some lip glosses.
 It's also quite bendy/flexible due to the indent (is that the right term?) on the stem of the wand - not that I think it makes much of a difference - although I tried to use this mascara whilst in the car, and the flexi bit made it harder to apply on the move!
Although, that being said,  makeup on the move isn't the easiest of tasks to begin with. >.<

Miss Manga Punky:


This is a totally different kind of wand from the original!

Whilst still tapered, this time, instead of the more common bristles, we've got short, hard plastic spikes that allow for a lot of product to go on at once.
 I usually very much dislike this sort of applicator, as I find it makes lashes clump together a lot...but this is exactly what Miss Manga Punky is supposed to do, so in that token it's fit for purpose!


Application: 

My eyes without mascara....and a very silly face, the theme of this post >.<

Here's a silly pic of my face without mascara! My lashes aren't super long, somewhere about average length I reckon, though not the darkest of things....seeing might be an issue. They tend to be a lot lighter at the tips, which makes them look shorter than they actually are.  -_-
 I do feel like my bottom lashes are more visible in real life than my top ones, so it's going to be interesting to see what I look like with these on!

Miss Manga:

This was quite a thick consistency product, but it applied alright - it wasn't too wet and dried pretty quickly!
It gave me a good length, and it added some extra volume, and it pretty much does as the promo shows.
The packaging says 'MEGA VOLUME' however, I don't really think it's terribly 'Mega' on the volume side if I'm honest. 

Miss Manga Punky:

Another quite thick product, but wow it is wet at the same time! I suppose this is to get your lashes to clump together, which it kind of did...and it took  longer to dry due to this! 
 According to the promo images, this mascara is supposed to give you a punky, super clumped together, spikey look - but you're not going to get that look from just applying it! 

Well, I didn't anyway...

 In order for my lashes to make spikes, I had to use some tweezers to press them together...so I find that misleading.

Both Products:
What I noticed with both products, as a side note, is that they have an unpleasant smell to them ...yes, I smelt them. Yes I did. 

I don't really think that there's a huge difference between my lashes if I'm totally honest, I did expect it to be a lot more dramatic.


Taking them off:


This is where it gets a bit interesting.

Miss Manga:

Ok, so this came off nice and easy, I really can't complain.

Miss Manga Punky:
Ugh. This took a while to come off! Because it dries hard and clumpy thanks to so much product going on your lashes, it takes a good bit to remove it - it will come off as a normal mascara, but also little clumps may stay stuck to your lashes, or it will come off in clumps too.
 It's wasn't fun to remove, so I wouldn't recommend you trying to wear this on a daily basis.

When water hits: 

Unfortunately the first time I tried these both, I'd just had word of a close family bereavement and so I was pretty teary.

On that note, HOLY HELL! I've never had mascaras that ran down my face, blackened pillows/bedding etc as much or as quickly as these products!

For the Miss Manga Punky that requires much effort to remove, it doesn't half spill down your face at the first sign of tears!

 I know they're not  'waterproof' mascaraa, but I didn't think they would react that easily! If I got caught out in the rain, I'd look like a complete wet weekend.

Which one would I choose to wear again?

Am I Punky or Angelic? (please excuse the hair)


For definite, the original Miss Manga wins hands down on this. 


I'm happy to keep on using the Miss Manga until it runs out, but I'll definitely be going back to my usual Maybelline Colossal, as I much prefer it and it's also a couple of quid cheaper!

I'd like to say that I'm disappointed by the Punky version, but I was apprehensive about it to begin with, so I just proved myself right unfortunately.  I'll use it as an alternative to bottom false lashes to use it up, which works fine, but wouldn't like to recommend it to anyone.


What do you guys think? Have you used either or these before? Do you like them? 
As usual, let me know in the comments below!

Love,
          Kasumi x

Wednesday, 17 June 2015

Review: Makeup Revolution Highlighter Golden Lights

Hi Sweethearts,

Sorry for the lack of activity here as of late! I've had a random bout of Iritis that left me with poor vision and unable to wear makeup for a week, and also some family issues have meant that I haven't been as active as I'd like to be.

I hit up my local Superdrug branch to pick up some new makeup whilst in passing - having realised that I ran out of concealer and needed a new mascara, I thought I'd see what I could snap up!
I will be reviewing and comparing items over the next few posts, so please keep checking back for these!

I've been in the market for a new shimmery highlighter powder ever since I managed to lose my last one. >.<
 When I spied this little beauty in the Makeup Revolution section I couldn't resist giving it a go!


This is the Vivid Baked Highlighter from Makeup Revolution in the shade 'Golden Lights'.

I tend to have a preference for a powder or baked highlighter, as opposed to a liquid for some reason, though I think that tends to be because I really like to notice I'm wearing it, and want don't want to risk it moving my foundation like I found with the last liquid I used.

Packaging:


The packaging is sleek and simple, and I really like the swirly pattern of it - it sort of reminds me of those Guylian seashell chocolates!

  Product: 


The highlighter wasn't hard to get onto the brush (some baked products can be a bit hard to get going) and has a really strong pigment/shimmer, so a little will go a long long way with this! (seriously, you only need a tiny bit, it goes on preeeeetty strong if you're not careful!) 

I applied this just with my finger to show it on my hand quickly, and this is how it turned out - so it's safe to say that you need to be quite careful when using it!


This shade has a lovely pale gold/creamy tone with an amazing pearly sheen to it - it's absolutely gorgeous when it catches the light and definitely brightens up your face.
 It also blends really easily, which is a massive plus!

I'm a little bit in love with this - it gives your skin a beautiful, summery glow that lasts all day!


Price:


This comes in at...wait for it.... £3 from Superdrug, which is great value for money, given the quality and amount of product you get - it's a pretty large size!


Overall Verdict:


I really like this product for the summer time, as it makes me feel a bit like I'm on holiday/at the beach - good value for money, and something that I will most likely buy again!

This comes in 2 other shades, a pink and a peach, all of which you can get here: http://www.superdrug.com/Makeup-Revolution/Makeup-Revolution-Highlighter-Golden-Lights/p/978758

In this pic I've applied it lightly in all the usual places, and also under the inner corners of my eyes - which is the part that the camera is picking up the best.


That's all for this time - if you have any questions or comments, you know what to do!

Love,
          Kasumi x

Thursday, 4 June 2015

Steal this Style: Sexy & Sophisticated Photoshoot


Hi Sweethearts,

The other week I finally managed to be brave enough to get in front of the camera and model again, after being extremely reluctant to do so due to my own body & confidence issues - so I thought that I would share this with you.

After much humming and hawing over what to shoot with the wonderful Louise from Louise Cantwell Photography  - we had originally planned to shoot some avant garde, fantasy, ethereal style fashion, incorporating a bespoke headpiece.
     However, after having a huge confidence crisis that morning whilst getting ready (Thankfully she's a very good friend of mine, so is used to me looking in the mirror and freaking out, repeatedly deciding that I hate myself and am a terrible disgusting person etc before I finally get the courage to do things.) and a failed attempt at putting together a last minute outfit (my sewing machine played up the entire night, and the outfit was far too sheer for going outdoors in public)  we ended up raiding my wardrobes to shoot a more glamorous, yet sophisticated type of fashion shoot - complete with some gal makeup!

The dress I chose was one that I picked up from Ebay last year on a whim, thinking that I'd love to be able to go somewhere/do something that would warrant wearing it - so it was a perfect choice for making me feel a little more like myself again.


I'm always a little wary when picking outfits from Asia, as I'm a lot more curvy, and pear shaped in figure so always wonder if it will fit over my butt or not! Luckily though, it's pretty perfect and makes me feel slimmer/more hourglass-like, due to the peplum and puffy shoulders.

I teamed the dress with a nude pair of heels from Primark, having not yet invested in a nice white pair (suggestions welcome)

Here are some shots from our adventure into the posh, quaint little side streets of my town & a local park bridge.  ^_^


I also happened to come across a sailor hat on my rails, which I think is maybe Russian, and couldn't resist taking it along as a fun prop! (feel free to correct me in regards to its' origin) 


It felt really strange getting back into posing that isn't a selfie, but at the same time I really enjoyed myself once I got back into the swing of things.
 It was a different style for both of us image wise, and it was a lovely to feel a bit more sexy/glamorous for a change!

I really love the more grown up, 'cool' type feel of these images - the outfit is pretty flashy for me, which I love, but the images are more casually styled....if that makes sense?

I would love to know your thoughts of the images, and do you wear clothing similar? Would you?
Let me know in the comments below ^_^

Love,
           Kasumi x


Tuesday, 26 May 2015

Lens Village Review - Gothic 3 Tones, EOS DollyEye Circle Lenses

Hi Sweethearts,

Hope you're all doing well!

I have a couple of things that I'm itching to post about, the first of which is a review of some new lenses that I got through last week from www.lensvillage.com
I've been looking for a more natural set of Circle lenses that will enhance my eyes, as I want to have a more mature, Onee-gyaru style going on. Big, cute colourful lenses just wouldn't work for that, as much as I adore them.

After a lot of browsing the LensVillage store, I finally settled on Gothic 3 Tones, from EOS - DollyEye, in Blue, to add a little extra oomph to my natural eye colour.

After ordering, the lenses arrived in just over a week, which is great considering that they're coming from Asia.

How they arrived:


Once again, my lenses came in perfect condition with a little card and super cute animal lens case to keep them in. They arrived securely wrapped in bubble wrap to avoid any bumps or damage in the post - but I haven't taken a photo this time round of that, though you can see this on my last lens village review here!


This is what the lenses look like in the case. Admittedly, they're not as bright as the stock image (unworn), but the real images of them on the site below were a perfect match to what I received - I'm happy that they aren't as bright as the stock type image, as they wouldn't look as nice that way.

Here are the specs for them:


Power Available : 0.00 to -10.00

Price: £14.60 (pair)
Life Span : 1 Year
Diameter : 14.5mm
Manufacturer : EOS
Origin : South Korea
Lenses is manufactured by EOS and labelled under DollyEye. 
They come in a choice of 9 different colours - that's really great news, as I'd like to try out a different colour of them too.
   Price wise, they're also very reasonable, considering that they can last up to a year if properly taken care of, and my monthly prescription lenses from the opticians are £15 per month! 


Here is a little selfie of my natural eyes before putting the lenses in! 

Putting the lenses in: 


I found these lenses to be really delicate and soft, which is great for me as they were super easy to put in and really comfortable to wear once the initial annoyance of poking myself in the eye was over with.
 I wore these all day (8hours) without any issues, so I'm very happy with that.

I also love the subtle difference that they make to my eyes - they're very natural and not "in your face" circle lenses, so these aren't for you if you want a massive change.

Here are my eyes & lenses in different situations: 


As you can see, they give a slight enlarging effect, but without the hard black ring around the edge, so they look a lot more natural and, for me, grown up.

I really like the subtle colour boost that comes from them - they have that "pop" without being overdone and I really love that.
These are the type of lenses I'm more comfortable wearing on a more regular basis, and with my Onee-Gyaru style, which I feel suits me a lot better.

Here are a few pics with the lenses in: 


...and a little picture of todays' outfit!
Dress: Primark (I got it on sale for £5)
Belt: Primark (came with another dress)
Jewellery set: Primark (£4)


Overall Verdict:


Look: 4/5 (only because the stock photo showed brighter, in reality they're pretty perfect)
Fit: 5/5
Comfort: 5/5
Service: 5/5

I really like these lenses for more subtle looks, and will be wearing them regularly, though I'm very tempted to try the other colours in this range!


So, what do you all think?  Do you prefer the more natural look circle lenses, or the really dolly, cute type?

Have you used these lenses before - let me know in the comments below!

Love, Kasumi x

Thursday, 21 May 2015

Hair Transformation time - my first time getting extensions!

Hi Sweethearts,

So, this week I really wanted to chat about my latest transformation: My hair makeover.

Ever since I first went back to basics with my hair colour, I've felt increasingly upset and unhappy about it - sadly, it ruined my self confidence.
Gone are the funky, bright, fun coloured looks, and instead I feel like I've been fading into the background...and my bpd traits don't like it when I'm not in the spotlight (despite hating the spotlight at the same time, it's a strange cycle.) 
So I finally bit the bullet and went for a hair overhaul!

Sadly I can't risk bleaching my hair again, so I decided to finally give into temptation and get some extensions from the lovely Bracken at Candy Locks. (Click here to go to her page)


How my hair looked before (and a outfit pic) : 

Cardigan: Ebay
Top, belt & shoes: Primark
Jeans: New look


What Type of Extensions did I get?
After my initial consultation, I got 18inch long Keratin bond extensions as my hair is fine, in 2 shades of reddy-brown.

These Extensions are UK-based, Beautyworks Celebrity Choice bonds, and should last up to 6months, provided I take good care of them (which I will, I absolutely adore them!) 
Here are a couple of in-progress shots of the bonds being installed. Having them installed was completely painless (for some reason, I had expected it to hurt) & they don't show through my own hair at all.

 As you can see, I couldn't help taking pictures as I was so excited to finally have the long, thick locks that I've been lusting after for years!


Finished Results: 
I took a little picture of them when they were first installed and all straight, as I knew instantly I wanted to have them curled or in waves for the duration of the time I have them in.
Please ignore my fringe here, as the style part hadn't happened yet! 


Now for some pictures of my amazingly lovely princess locks all styled up! 


Pros & Cons: 

Pros: 
  • Long, thick, lovely locks
  • Easy to style & holds curls/waves well without hairspray
  • Lasts a good amount of time (usually the same amount of time it takes me to get bored of something) 
  • Painless installation
  • Blends well with own hair
  • Massive confidence booster for me
  • Silky smooth feeling
Cons:
  • I'll miss them when they're gone
  • Requires proper aftercare/maintenance to keep them looking lovely
  • A bit tender to sleep on to begin with due to being new
  • Not for those on a tight budget as it's a pretty big investment. 
Final Verdict:

I think we all know what I'm going to say here - I'm absolutely besotted with my new locks, and can't thank Bracken enough for doing them for me!


Love,
          Kasumi 

Sunday, 17 May 2015

Etude House - Dr. Ampoule Review (Lifting Care)

Hi Sweethearts,

Sorry that this weeks' post is a little late, I'm been rushed off my feet at the moment! >.<

After rushing around, I felt like I was definitely in need of some "me-time" and so I decided to kick back and relax with the Etude House Dr. Ampoule facemask - lifting care.
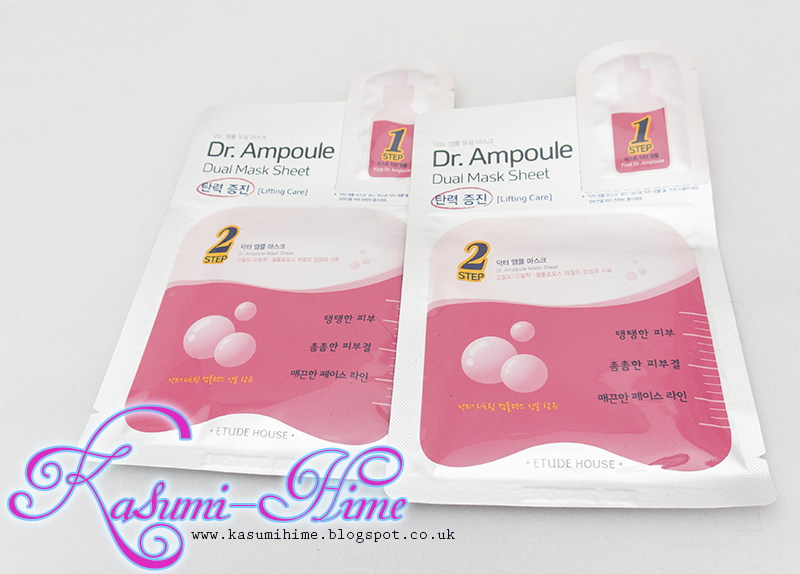


Little bit about this:

This is from the Korean Brand Etude House (http://www.etudehouse.com) that I absolutely adore, from their Dr. Ampoule range of mask sheets.

These come in a few different types, such as brightening, time , essential, vital, and the one I'm trying out: Lifting care.
 This mask sheet is said to make your skin firmer and more youthful, with the concentrated ampoules, it's supposed to be super effective.

These can be bought on etudehouse.com for $3.50 each, which at the moment is around £2.23 - so these aren't bank breaking at all! 

Here is my before face - (apologies for the super tired, "I need a break" look) >.<

How to use the mask: 

Ok, so this is a 2 step face mask, which is something that I've never experienced before but fun to try out!

STEP 1: The first step is to open & apply part 1, which is the lifting ampoule. This has quite a gel-like texture, and absorbs quite quickly into your skin to do it's job effectively.
Not too sure how well you'll see this in the picture, but I have just applied the ampoule. 

STEP 2: The second step is to apply the mask sheet (part 2) onto your face, having just applied the ampoule in step 1.

The Mask sheet fitted my face pretty ok, considering that this is a Korean product and my face shape is different to Korean Facial structure, I was quite happy with the fit.

The mask sheet was packed full of product, it was pretty slippery to unfold but I'd much rather lots of product instead of too little - because of this, it adhered really well!
It also had a lovely fresh, clean scent to it, that helped wake me up a little bit.

Result: 

So, after 20mins (pack suggests 15-20) chill time on my sofa, it was time to take the mask sheet off.
 Unlike other masks, the instructions on this told me not to remove the excess product, but instead leave it to soak into my skin.


This is how my face looks afterwards.
(Please excuse my hair, it's currently undergoing a change which I'll be blogging about next week.)

I don't know how much of a physical difference you can see, but there definitely is a little bit from the first time application.
My skin does feel firmer and tighter, which I'm really pleased about, and I had no issues or reactions at all with the ingredients

It's definitely a product that I'm going to use again, and I'd also like to test out the other masks in Dr. Ampoule range.


Have any of you used these masks? What did you think?
What type of masks do you like to use?


As usual, leave me comments below!

Love,

           Kasumi x