Wednesday 29 April 2015

Branching out into Onee-gyaru (Wardrobe Update)

 Hey Sweethearts,

Finally getting round to doing another outfit post!

Spring is finally here....well, it was here, briefly, until we had snow here in Scotland this week! >.<
 For the last while I've been having a good hard think about what direction to take my style & wardrobe in. I'm not far away from the dreaded 3-0, so it's probably about time I grow up in terms of style too.

That being said, I still want to keep my Gyaru influences, just make it a bit more age appropriate. Upon searching, I came across a style called "onee-gyaru". "Onee" translates as "older sister" and this sub-style of Gyaru is a more toned down, grown up & refined style - and I was quite excited to see this!

I haven't given myself Gyaru makeup here due to my eyes being pretty dry so lenses aren't a good idea, and my hair is in desperate need of a revamp, so I've just been tying it back and avoiding it!

I've been doing a lot of research and trying to find equivalent or similar items on a budget that can give me that look & hopefully rebuild my self-confidence. (lately, I'm struggling to wear items other than running gear and jeans with holes in the thighs....thick thigh issues)


I went a little nosey around Primark, hoping to find a nice dress & accessories to make an outfit from and I think I got something pretty good!

Dress:

Price: £13 - Primark
I really love the colours and pattern on this dress. I'm really into neutral tones, and the splash of blue worked so well to make it pop a bit more. 

It regards to the cut of the dress, I'm enjoying trying out higher necklines as usually I opt for something more low cut to show off my collarbones. (and make my bust look bigger than it actually is  - padded bras are friends, ladies! XD)
 The downside of the neckline is that it minimises the bust area for me, but it still looks nice. 
 Generally the dress has quite a loose fit, which is why it comes with a little waist belt to pull it in and give shape. Unfortunately I currently lack shape (well, aside from pear...), so every little bit helps. 
 I wasn't entirely sold on the little thin belt as I didn't feel it pulled my in enough for my liking, so when I added a jacket to it, I changed belts. 

Shoes:


I also realised that I had thrown out all of my little flat shoes in my last wardrobe clearout, so had to get myself a couple of new pairs. I found these little brown ones for £6 which matched the belt on my dress, so picked them up.

Price: £6 - Primark

These are super comfy and fit well, so perfect for running around in town, and for when I need to change out of heels! (I always like to carry flats in my handbag if I'm going out in heels)

Bag: 

I went out shopping with a good friend of mine who came back to visit this week, and stupidly went out without a handbag - only grabbing my purse and keys before running out of the door! -_-

However, I used this as an excellent excuse to buy this cute little bag that I spied on my last venture to the shops: 
Price: £8 - Primark

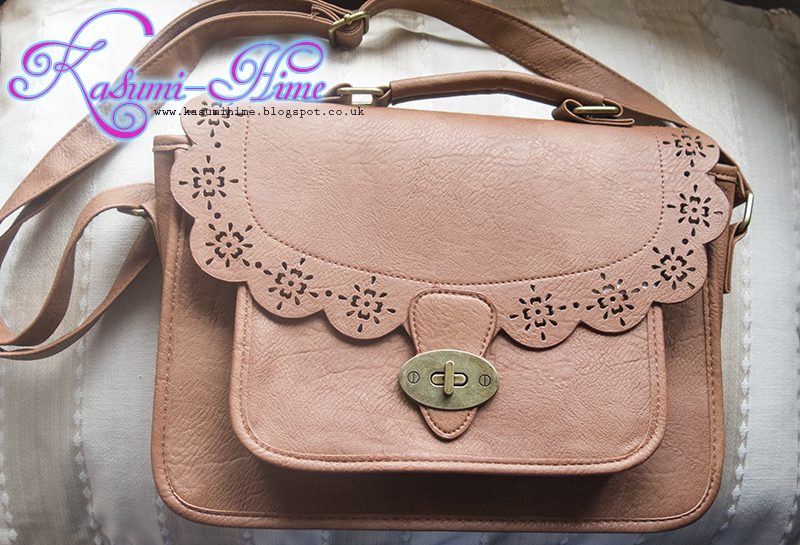
I absolutely LOVE the lace cut out detail on this, it's just so cute! ^_^ It also fits in with the rest of the things I bought the few days prior, so that's always a plus!
To be honest, I've been wanting a brown bag like this for the longest time, so I'm really happy to have it.
It's quite a small bag (for me, at least) but it can hold my big purse, keys, phone, makeup & mirror, and a Manga quite comfortably!
The drawback is that it doesn't have a zip, which is quite a big deal for me - I'm a paranoid person, and prefer to have a zip underneath for extra security.


Outfit: 

So here is my outfit!

I teamed this dress with my favourite soft, nude coloured jacket from New Look that I got a couple of years back. I kept the accessories simple with a little necklace and bracelet set that I also got from Primark for £4, and a thicker belt that I had in my cupboard (also from Primark a few years ago).


Improvements: 

Ideally to complete the look, heels are definitely a requirement, but I haven't found a pair to match that I like enough to buy. Do any of you have any suggestions?
I also need to make an effort with my hair & makeup...I can't wait to take a bottle or 2 of dye to my hair again!
  I've been trying my best to let my hair grow out after all the bleaching, but I'm getting to the point of hair hatred, where it's a case of I either;

a) Dye it and get extensions
or
b) shave it all off and start again

I don't mind the brown so much, but all the same 1 colour is too plain and boring for my tastes...I really want to add some blonde into the mix.

What do you think?
Have you got any hair or shoe suggestions for me?

As always, leave me comments below!

Love,

          Kasumi x


Sunday 26 April 2015

Eyebrow Threading Experience (thread vs wax)

Hi Sweethearts,

Sorry this weeks' post is a bit on the late side, but I've been pretty busy and to be honest, I'm having a massive lack of body confidence and self esteem at the moment, so haven't really felt up to putting myself in front of a camera.


I've always been asked how I get my eyebrows into shape, so I thought that a little chat about my brows might make for an interesting read. (even though my brows are pretty average without any filling in)


First Steps:

I let my brows grow in a bit for this post, so you could see how they were shaped:


Before & After Closeup:


How they were shaped:

For years and years, I'd meticulously tweeze my eyebrows (No 'plucking' - I'm not a chicken!) mostly every day in order to get the shape I wanted.
(I'd had my brows waxed a couple of times in salons before, but they were always horrendous, so had to take it upon myself to make them look right) 

I'd heard a lot about eyebrow threading, lots of it positive. However, as someone previously burned by salons, I was extremely dubious about ever letting someone near my brows again.

After much humming & hawing over whether or not to try, I eventually bit the bullet and have become a convert to it ever since.

This is the procedure I experienced with both waxing & threading in salons.

My Experience with Waxing in Salons:

1. Came in, asked to have my brows waxed (tidied up)
2. Lay back on the chair & eye area wiped.
3. Warm wax was placed on my brow area & then pulled off.
4. Slight bit of tweezing for little hairs, lotion applied, then asked if OK. (Yes, I should probably say at this point that I'm not happy with them, but I'm one of those people that are too scared to speak up at times so just agree then go home and finish the job myself.)
5. Sent on my merry way

My Experience of Threading in Salons:

1. Came in, and asked for eyebrow threading
2. Lay back on the chair
3. Lady had a good look at my brows, and wiped area.
4. Threading process began
5. Slight bit of tweezing for any odd hair that was missed
6. Brow hairs were trimmed
7. Lotion applied and asked if OK.
8. Sent on my merry way

As you can see, from my experience, a lot more care was taken with my brows whenever I get them threaded as opposed to waxed. This may not be the case for everyone - but for me, waxing in salons was more about getting me out of the door as quick as possible to get onto the next person.

A lot of people told me that threading was so much more painful than waxing, however I felt totally relaxed in the chair, and the 'pain' was only a discomfort and actually felt quite therapeutic. (I might just be a pain weirdo though XD)
Which to pick?

The choice is entirely yours, however I much prefer to have my brows threaded.
I've made a little Pro & Con list of my thoughts on wax vs. threading below for you to check out!

Waxing vs. Threading:Waxing Pros:                                 Threading Pros:
+ Quick                                                  + Sharper, more defined brows
+ Less Painful (to some people)            + No chemicals being put on your face 
+ Easy to do at home                             + Less damaging/traumatic to your skin
+ Generally Cheaper                             + Better for sensitive skin & those on strong medication
+ can use on larger areas                       
+ Can ask for organic thread to be used if you have any                                                                              allergies/sensitive skin


Waxing Cons:                                 Threading Cons:

+ Harder to get detailed brows               + Takes a bit longer
+ More damaging to skin                       + Slightly more painful (to some people)
+ Not good for those with sensitive       + Slightly more Expensive in most cases

skin or on strong medicatoin                  + Difficult do at home by yourself                                            + Can cause allergic reactions               + not suitable for larger areas


Final Thoughts?

How do you all shape your brows? Do you wax, tweeze or thread?
What kind of experiences have you had? 

Comment below and let me know!

Love,
           Kasumi x

Monday 20 April 2015

Etude House Makeup Review pt. 3

Hi Sweethearts!

Finally finished doing my reviews of the Etude  House Makeup from my haul. I'll go some posts about the skin care products when I get round to using them too, but after this post I'd like to break it up just a little bit!

I've been having a little think about what to do with the purple etude house shadow, but in the end I went with my first thoughts on using it as part of a smokey eye look.


First thing's first - I wanted to see just how pigmented a colour this was compared to the mint. 


The tester at the top is the colour on bare, non primed skin - as you can see it's more pigmented than the mint as it's a darker colour, but it's still a bit sheer for my liking. The bottom test patch is the shadow applied on top of a base (in this case, white eyeliner pencil) which makes it a lot richer and brings the lovely purple shade right out.

It also has such a lovely shimmer to it & applied pretty easily took, catching the light really well for a light metallic finish.

The Look - Eyes:

I went for a dark smokey type look here, using the Etude purple shadow by itself in the middle of my lids, and blended with Rimmel Glameyes Black shadow at the corners, and blended upwards towards my browbone.

I highlighted my browbone using the Etude House Crystal Tear Powder that I got a while back from a friend. This stuff is super metallic/sparkly and comes as a loose powder that you really need just a tiny amount of! I like to use this on occassions that I want a super sparkly/shiny look, though it doesn't tend to show it at it's best on camera - you have to see it in person to appreciate it!


The changes between the black and purple shadows are really subtle since it's such a dark purple shadow, but for a nice smokey effect I think it works really well. For me, this is more of a night out type of makeup than for during the day - unless you're the kinda chick that rocks a smokey eye and edgy style on a day to day basis, like I used to!


Lips: 

For my lips, I wanted to give them a natural gloss, so road tested what has become a favourite gloss - the Dear my Crystal gloss from Etude House.


This is the cutest gloss! It's got little sparkles in it, so it shimmers in the light. The soft nudey pink colour blends to my lip colour well, and is super glossy and long lasting - I really adore this & want to get more of them!

Here it is on my lips:


So this concludes the Makeup review Section of my Etude House Haul....finally!

I really hope you all like the looks I've created with these wonderful products, and hopefully you'll stick around to listen to my other ramblings!

As always, any comments or questions are greatly appreciated, so feel free to leave me a message below!

Love,

Kasumi x

Monday 13 April 2015

Montagne Jeunesse Facemask Review - TeaTree & Spearmint


Hey Sweethearts,

I've been getting some different face masks lately, as I'm trying to take better care of my skin (especially now that I'm in my mid 20's and should be thinking about it more).

At the moment my skin is hit or miss, which is down to a combination of diet, general health and hormones trying to settle back down from restarting the contraceptive pill.
I don't know about the rest of you, but at certain times of the month, my skin tends to be oilier (I do have naturally oily skin anyway) and generally likes to break out - what about you?
Sorry to bring this up for any male readers, but yes, we're having the period chat, because it likes to alter your skins appearance and that's just plain mean & uncalled for!

So, based on my oily, spot prone skin, I picked up a Spearmint and TeaTree face mask from Montagne Jeunesse in my local Asda store, for the grand total of £1.28.
Tea tree has anti bacterial properties and reduces inflammation, whilst spearmint is supposed to fight the oil, and leave your skin feeling tingly.


First up I gave my skin a wee cleanse....so here's a mugshot of a very barefaced, deeply awful looking me, fresh from the bath *hence the towel-hat* 


Let's pop on the cotton mask! Unfortunately, I never seem to be able to have these things fit me properly, either I have a tiny face, or these are made really big - especially at the chin area!

Do these things fit you ok? Let me know!


So, the packet said that this should only stay on for about 5-10 minutes max, and it should leave my skin feeling brighter, fresher and more even.

So, off I went to chill on the sofa for a little bit.

The smell of the spearmint was really strong, and my skin tingled quite a bit - definitely not a mask to have on for longer than 10mins. That aside, I really did enjoy having it on and chilling out for a bit, and felt a lot more awake afterwards!

When I took the mask off, I definitely noticed that my skin looked a bit brighter and didn't look as tired as it did beforehand. It also felt a lot nicer and smoother, and looked a bit more even in tone too. (There are differences in the lighting from the first photo - so difference is more subtle than photos show)


Verdict: 

I quite like this face mask. It's nice to use the cotton masks as opposed to the ones you kinda just slap on your face, and then spend ages trying to get it all off!

I like the effect it's had on my skin, it feels smoother and brighter, though if you're sensitive to any of the ingredients especially the mint, then it's maybe not for you as it's pretty strong!

My skin hasn't really freaked out after having used it, and it's been a few days now, so that's always a plus.

Would I buy it again? For £1.28 I probably will - face masks are a great way to force myself into taking a break & relaxing, so it's a double plus.

Love,

Kasumi x


Thursday 9 April 2015

Etude House Review pt2 - Mint Choc Chip & Coral

Hey Sweethearts,

Finally getting round to part 2 of the Etude House Makeup & Skincare product reviews...trying to use them for different looks instead of just a swatch and a chat.

This time round, I created a mint-choc-chip cut eye makeup, and then teamed it with a coral lip. 

So, for this look I used these Etude items from my Haul:


Mint Green (left) 

Firstly, for this look I wanted to test out the Look at my Eyes eyeshadow in that lovely minty green.
When I first tried to apply this to my eyes without any primer or a base, I found that whilst it was easy to come onto the brush, it looked barely there on my eyes which is a little disappointing.
 The most that you could see was the shimmer, as the colour was pretty much non-existent.

However, I then decided to apply a good base to my lids to give the shadow something to stick to, and pressed it on. When I applied it to my eyes in this method, that lovely light, minty green shade came through really well and it lasted the entire day which is really pleasing. 


Brown (shade 50)

Next up, I wanted to see how well I could create a cut crease using the play101 pencils as a base.

For this, I wanted to complement the green with a brown tone, so used the brown play101 pencil to draw in my crease. This went on extremely well, and created a nice thick line for me to blend out to create the base of the cut crease. Where possible, I like to use an eyeliner or eyepencil of some description to create a nice sharp crease.

Thereafter I set the play 101 pencil with a couple of shades of brown eyeshadow (from the w7 palette in my previous postings) to add a little depth and shimmer. 


For my lips, I was so excited to Try out the Dear my Wish Lips-talk in the Coral coloured shade.

I've never really thought that I would suit a coral lipstick, but I was quite surprised by how much I like it! It's a really lovely shade, and much like the shade23 play101 pencil, this just glides on your lips in such a strong, lovely, smooth consistency! It really is a total joy to apply.

I found that this lasts really well throughout the day, and only needed 1 top up during the day,after eating! Definitely looking into getting some more of these in various shades...I think there will be tears when this runs out!


Final Look: 

Here is the look I came up with, what do you all think? Have you used any of these products?
Let me know in the comments below! 


Love,
          Kasumi x

Sunday 5 April 2015

Makeup Brushes on a budget (under £20)

Hey Sweethearts!

I know a lot of you are hoping that this weeks' post is going to be part 2 of my Etude Haul reviews, but unfortunately I managed to lose my makeup brushes so haven't created any new looks with the Etude Makeup due to this.

However, I figured that having to go brush shopping would be a good opportunity to talk to you all about what makeup brushes I tend to use, as it's been requested quite a bit!

So, I went back to my high street go-to shop, Watt Brothers to see what I could pick up with a budget of no more than £20 to spend on Brushes. 

So this is what I ended up buying! 


All but one of these brushes are by Royal Cosmetic Connections - the other is by BC.
 I really like the quality of the Royal Brushes, having had a few of them before (I'm still upset at losing my brushes *sob*  even if a lot of them did come from Lidl heehee) especially taking the price tag into consideration!

I don't feel like it's necessary to spend a fortune on makeup brushes, when a cheaper option can do the job just as well!

When looking for brushes, I like to take a good look at the materials/fibres and see how soft/hard/synthetic/natural they feel. I don't like overly plastic-y feeling brushes as they tend to be more springy and just push makeup around the palettes as opposed to picking up product and putting them on your face - The brushes I'm showing here all pick up product really easily!


Foundation


This is the foundation brush I've used for the last few years.

For me, I tend to favour liquid foundations, and for photo shoots I tend to use quite a heavy one (Max Factor Colour Adapt), although my daily foundation is a lot lighter (Rimmel Match Perfection) - so this brush works well. I wouldn't recommend it for powder/mineral foundation though.

I like to use this in the same way I would a paint brush, and I find that it blends pretty well and doesn't leave any streaks.

Price: £2.99


This is a new item for me, as I'm not normally a fan of sponge applicators as they tend to soak in more product than they put out, which is a bit counter-productive.
   However, I find that if you slightly dampen these first, then it stops a lot of the product soaking in, whilst still letting you apply product. The sponge on this is nice and soft feeling against your skin, whilst still being firm enough to apply product. It has a flat surface at the front that would suit flatter areas of your skin eg. forehead, whilst the round back will do other areas. The tip is sharp enough to get into corners eg. side of nostril etc, and it blends alright.
 I'm more inclined to use this as more of a blender than a full on applicator - using my other brush to apply, then the sponge to blend in.

 It's pretty much on the same vein as the Beauty Blender that everyone is talking about as of late - I'd like to get my hands on one to test it out at some point!

Price: £2.99

Powder/Blush:


This is a lovely soft big powder brush (I like to use this for powder blusher too) that does exactly what it says on the tin! It's got enough firmness to effectively pick up product, but is soft enough to blend & buff your face without wiping off your foundation.

Depending on your face, you may be able to get away with using this for your contour (I can - obviously not for nose contour though!) but some of you will find it too big. One of the only brushes I didn't manage to lose is a slightly smaller version of this, which is my preference for contouring.

Price: £2.99


Eyes: 


I have to add a little disclaimer here: I like to buy eyeshadow brushes!  
First up is the biggest of the eyeshadow brushes. Again, this is a lovely soft brush (but not too soft until it becomes flimsy) that picks up product with great ease.
 I like to use this bigger brush for applying shadow from my browbone to my crease.

Price: £1.49


This is another new brush for me, which is from Body Collection (BC) - it's another large shadow brush, but it's slightly smaller than the one above. The fibres are pretty much the same as the Royal, so easy to apply and blend with.
 This brush for me will be more of a general eyeshadow brush for bigger areas eg. lids/crease. 


Price: £0.99


So this is the smallest of the eyeshadow brushes that I bought.

Again, it's of the same quality as the previous, though slightly smaller for more delicate areas eg. under eye, or for looks with more depth/detail.

Price: £1.49


This brush is slightly different to the brushes above - the other eyeshadow brushes are flat with curved tips, whereas this brush is completely round, making it great for contouring places like eye sockets. I also like to use this for nose contouring along side a bigger shadow brush to blend further.
 I think these are good for working on cut crease or smokey eye looks,

Price: £1.49


Last up for my eye brushes is the eye shading brush. This is another different brush for me, but one I quite like.

Unfortunately, somehow I forgot to take an individual photo of it in the packaging, but this is by Royal (you can see it in the packaging at the top of the post in the shot of all the items together)

 This is, again, a slightly different brush. The fibres are shorter, and a bit stiffer than the other brushes. This is more the kind of brush that I'd use for creating a defined cut crease look - which is a look that I do quite a lot. I also find this pretty good for smudging pencil eyeliner for smokey effects as it's that little bit stiffer.

Price: £1.99

Brows:


My beloved Angled brush! This is probably my favourite brush, because I'm a bit eyebrow obsessed!

This is a lovely thin brush, with just the right amount of stiffness to create sharp, defined brows! I also use angled brushes to create sharp lined eyeshadow, occasionally defining a cut crease further, and also for gel eyeliner (for the rare occasions I use Gel)
 Any sort of thing that requires a sharp line - this is my go-to brush!

Price: £0.99


The Bill

Now for the not-so-fun part....parting with your hard earned cash! >.<
Here is a copy of my receipt: As you can see, in Scotland we have a carrier bag charge, and I also topped up on my concealer. Taking off the price of the concealer and bag, my total brush purchase came to £17.41!

I know there are complete brush sets that you can buy online, some of them may also be worth checking out (let me know in the comments box!), but I much prefer to pick and mix my brushes separately, and I like to be able to check them out in person to make sure that they're the ones I want. (I have a bad habit of procrastinating with online shopping and ending up buying the wrong thing!)  


I'm very happy with my purchases, and being within my budget - I can't wait to get back to creating different looks for you all! Hopefully this is helpful to those that were wondering what I'm using!

You can buy Royal products on Amazon, for those who don't have a Watt Brothers Store close by:
http://www.amazon.co.uk/s/ref=bl_sr_beauty?ie=UTF8&field-keywords=Royal+Cosmetics&index=beauty&search-type=ss

You can also find BC items on Amazon too! 

What kind of makeup brushes do you use? Do you use them? Do you have a favourite brand or type of brush?
Let me know in the comments below!

Love,
           Kasumi x